Related Posts Plugin for WordPress, Blogger...
Showing posts with label Oven Recipes. Show all posts

Monday, 19 September 2016

Stuffed garlic bread / Perfect Domino's style garlic bread

Domino's original taste of Garlic bread with cheesy stuffing. Wow!..  All the kids and even we will also tempting in the name itself. Today, I tried at home and,,,....Full of excitement I have seen from my daughter!.. She is very happy and enjoyed a lot with it's perfect taste of cheesy stuffed Garlic bread.
In this garlic bread, I added crushed garlic while kneading the dough. We can also add garlic paste or powder. I also add chilly flakes. When I was kneading the dough itself the rich aroma surrounded  the whole house. I used little butter to knead the dough. It makes the bread more softer. I'm very excited to share this recipe with you all. Let's see how to prepare the kid's most favorite stuffed garlic bread.
Basic information :
Preparation time : 5 Mins
Kneading time : 10 Mins
for foaming : 1 Hour
Baking time : 30 Mins
Bread : 2 Nos
Ingredients :
Maida : 1 Cup
Crushed garlic : 1 Tsp
Chilly flakes : 1 Tsp
Oregano herb : 1 Tsp
Salt  : To taste
Yeast : 1 Tsp
Sugar : 1/2 Tsp
Cheese 1 Cup
Corn kernels : 1/2 Cup
Coriander leaves : 1 Tsp
Method :
Mix yeast and sugar in warm water in a bowl and leave 5-10 minutes to foaming.

Crush garlic. Keep ready with chilly flakes, oregano seasoning and butter.

In a large mixing bowl, take one cup of maida. Add salt, crushed garlic, chilly flakes, two teaspoon of butter and mix with the flour.

Mix the yeast with water for kneading the dough. Knead the dough at least 5 mins  to make softer. Leave for one hour to foaming. After foaming, again knead the dough slightly and divide equal parts.

Roll to flatten the dough with rolling pin.

Add shredded cheese, boiled corn kernels, chopped coriander leaves.

Close the dough in semi circle shape by pressing the edges with your hand.
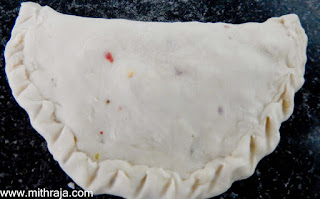
We can also butter wash on the top..It's Optional. Sprinkle some oregano seasoning on the top. Slightly cut the dough for stripes.

Bake in preheated oven in 200 degree Celsius for 30 Mins till golden color comes on the top.

Stuffed garlic bread is ready to serve with cheesy dip with perfect aroma.

Everyone please try this yummy delicious recipe and don't forget to share your thoughts..


Sunday, 18 September 2016

Veg Burger \ Home made Veg burger

One of my daughter's favorite out side food is burger. Every time, when we go outside for dinner, she used to ask Pizza or burger. Then I decided to try the veg burger at home. It's nice and very tasty. Normally, my husband not preferred to buy burger. But when I prepared  at home, he  liked very much. I used aloo tikki in this burger. We can use our own innovative new ideas to make tikkies, veg or non-veg. It shall be grateful to share this lovely kid's special recipe for all the kids.

Basic information :
Preparation time : 1 Hr
Cooking time : 5 Mins
Serve for : 2 Persons
Ingredients :
For Tikki :
Potato : 3 Nos
Onion : 1 No
Mint leaves : 10 Leaves
Coriander leaves : 10 Leaves
Turmeric powder : 1/4 Tsp
Chilly powder : 1/2 Tsp
Cumin powder : 1/2 Tsp
Garam masala : 1/2 Tsp
Salt : To taste
For Burger :
Bun : 2 Nos
Tomato : 2 Slices
Onion : 2 Slices
Cucumber : 2 Slices
Mayonnaise : 2 Tsp
Cheese slice : 2 Slices
Method :
Make the bun using bun recipe. The link is here..Bun recipe . We can buy bun from bakery shop.
Boil the potatoes, peel off and smash it.
Add chopped onions, Chopped mint leaves, coriander leaves, and all the masala powder with salt. Mix it well.
Make tikki size roll in the potato mix. Make bread crumbs. Dip the tiikies in the bread crumbs.
Heat oil in the frying pan, make shallow fry the tikkies in both the sides.
Cut the bun in two slices. Spread mayonnaise over the bun slices. Add potato tikki, onion slices, tomato slices, cucumber slices. Add cheese slice over it.
Close the burger and again put it in the oven for 5-10 minutes.
Veg burger is ready to serve with tomato ketch up.
Try this delicious recipe and please share your priceless thoughts.    

Friday, 16 September 2016

Paneer Mushroom Hariyali Tikka / Hariyali Tikka \ Tikka recipe

Hariyali tikka is prepared with green chutney with hung curd or yogurt. Today, I tried this wonderful hariyali tikka using paneer and mushrooms with capsicum and onion dices. It is very tasty and very easy to prepare also. We can make in chicken also. I already tried hariyali chicken gravy.

I have used mint leaves, coriander leaves, curry leaves, ginger, garlic for the green chutney.  Then we have to mix with hung or thick curd. We have to use the hung curd, then only the masala will go inside the paneer and mushroom and the taste will also be very nice. We need not use any masala powders. This is my husband and my daughter's favorite recipe. I am very glad to share this wonderful recipe. Let us see how to prepare the tasty perfect hariyali tikka with paneer and mushroom.

Basic information :
Preparation time : 10 Mins
Soak time : 20 Mins
Cooking time : 20 Mins
Ingredients :
Mushroom : 1 Pack
Paneer : 150 Gm
Thick curd : 1/2 Cup
Mint leaves : 1/2 Bunch
Coriander leaves : 1/2 Bunch
Curry leaves : 10 Nos
Ginger : 1/2 Inch
Garlic : 4 Pcs
Salt : To needed
Method :
Wash the mushroom and add in boiling water for 3 minutes. Cut the paneer and add it into the hot water for 5 seconds for softening.

Make a paste with mint leaves, coriander leaves, curry leaves, ginger, garlic, cumin seeds with salt.

In a large mixing bowl, add the green chutney paste with the hung or thick curd. Mix well.

Cut the capsicum and onion in dices. Add blanched mushrooms and paneer, capsicum, onion dices with the green chutney mix. Refrigerate for 20-30 minutes.

After soaked, arrange the veggies in tikka skewers alternatively.

Grill in preheated oven till it done. We can also make tawa fry exactly like mushroom tikka which I have already posted. The link is here..Mushroom tawa tikka. After grill, serve hot with onion rings as starters.
Try this tasty hariyali paneer mushroom tikka and please post your sweet comments..

Thursday, 15 September 2016

Burger Pizza \ Home made Pizza burger

All the kids are attracted by Pizza, Burger. Introduced Pizzaburger in Domino's is a very big treat for them. I tried this recipe at home and my daughter enjoyed a lot. She was very happy. She hug me and kiss me after eating this burger pizza. She appreciated me and that's a big encourage for me. I am very happy to share this yummy recipe with you all.
I used pizza dough for this. I also tried in bun dough. That is also very nice. But in bun dough, we will add egg. Being pure vegetarian, we can use pizza dough. We can add any veggies of our innovation for stuffing. We can use egg omelet for Egg pizza burger. Come let us see how to prepare the perfect Domino's taste of pizza burger.


Basic information :
Preparation time : 20 Mins
Baking time : 25 Mins
Pieces : 2 Nos
Ingredients :
Pizza dough : 2 Rolls
Mayonnaise  : 2 Tsp
Cheese : 2 Cubes
Carrot : 2 Slices
Cucumber : 2 Slices
Onion : 2 Slices
Capsicum : 4 Pcs
Method :
Prepare  Pizza dough. Pizza dough recipe. Or Burger bun dough. Burger bun recipe
Take the pizza dough, make bun size roll and sprinkle oregano seasoning on the top.

Bake it in 200 degree Celsius for 25 minutes.

After baking the base buns, cut into two parts. Spread mayonnaise over the bun slice. Add grated cheese.

Add chopped capsicum, onion, carrots, cucumber.

Close the bun and again bake for 5 minutes.

Veg pizza burger is ready to serve hot with tomato sauce.    
Beat egg, add chopped onions, capsicum, pepper powder, salt and mix it well.

Make round omelet and add it in the bun slice over cheese.

Bake it 5 minutes. Ya... Tasty delicious Egg pizza burger is ready to serve hot.

Everyone try these mouth watering recipe and get appreciation from your kids...Please share your precious comments..  

Egg less coconut wheat cookies with choco chip \ Vegetarian cookies in whole wheat flour \ Perfect egg less coconut biscuits

Today, I tried coconut cookies in wheat flour for the first time. What a magic!., In first time itself it came very well. Crunchy, tasty and delicious cookies that all of my family members liked very much.
In this cookies recipe, I used whole wheat flour, brown sugar and other ingredients. We can also try in maida and white normal sugar also. I used the fried coconut in this cookies, that is desiccated coconut. My husband likes very much this biscuits or cookies. I am very happy to share this recipe to you all. Let us see how to prepare the tasty egg less coconut cookies.
Basic information :
Preparation time : 10 mins
Cooking time : 40 Mins
Quantity : 20 Nos
Preserve for : 1 Month
Ingredients :
Wheat flour : 1&1/2 Cup
Grated coconut : 1 Cup
Brown sugar : 1 Cup
Baking powder : 1 Tsp
Butter : 50 Grm
Vanilla essence : 1/2 Tsp
Choco chips : To decorate
Method :
Grate the coconut and dry fry it till the golden brown color comes. (Desiccated coconut).
Melt the butter and add vanilla essence in it.
In a large mixing bowl, take wheat flour, brown sugar, baking powder, desiccated coconut. Mix butter in the flour. Mix well.

Add milk and mix it well to make soft dough. No need to kneed the dough. Cover the dough in the bowl with the muslin cloth and  refrigerate for about 20-25 minutes. This will help the cookies to come in correct texture.
After 25 minutes, take lemon size ball in the dough, flatten it. Make in all the dough and arrange it in the butter greased baking tray. Add choco chips on the top by pressing by fingers.
Bake it in preheated oven in 200 degree Celsius for 35 minutes.
Hmmm...Yummy!...The tasty coconut cookies is ready to serve. Serve it after getting cool, so that we can feel the crispiness. We can preserve it in air tight container.
Try this wonderful snack and please share your valuable comments.